Building a smokehouse to preserve your own food is one of those self-reliance skills that can be fancy or simple. Smoking foods is older than recorded history, and though the practice was originally perfected as a means of preserving meat before modern dependency on electricity and refrigeration set in, home-smoked foods are gaining in popularity because they taste great.
Choose a well-drained location for your smokehouse, ideally in an area that can handle foot traffic. You’ll be walking to and from the smokehouse a lot while it’s in use, so you don’t want the area to turn into a sloppy mess.
There are many ways to build a structure as small as a smokehouse, but traditional pole construction offers a number of advantages. It’s simple, long lasting and quicker to build than anything else. You can even cut rot-resistant trees from your back 40 to make the frame if you’d rather not buy ready-milled lumber. The 6×8 size is easy to handle and doesn’t require any building permit.

Step 1: Install the posts
Start by setting over-length posts into holes dug down below the frost line, then plumb them with temporary angled braces. Cut the posts to length afterwards so the tops are all level, but don’t fill in soil around the holes just yet. Trimming 6×6 post tops to length after they’re upright isn’t as easy as cutting them on the ground, but it does create post tops that are all level and in the same place. This is crucial for everything else to work. You’ll need one post at each corner of the building, one post in the middle of the side and back walls, and two 4×4 posts flanking the doorway.
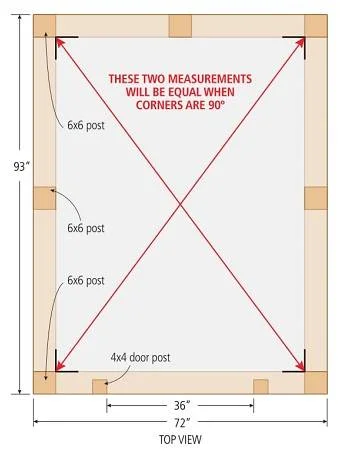
As you work with the posts, aim for two key things. First, opposite walls must be the same length. And second, measure and equalize diagonal distances taken from inside corner to inside corner. With these measurements equal, the corners of your smokehouse are guaranteed to be square.
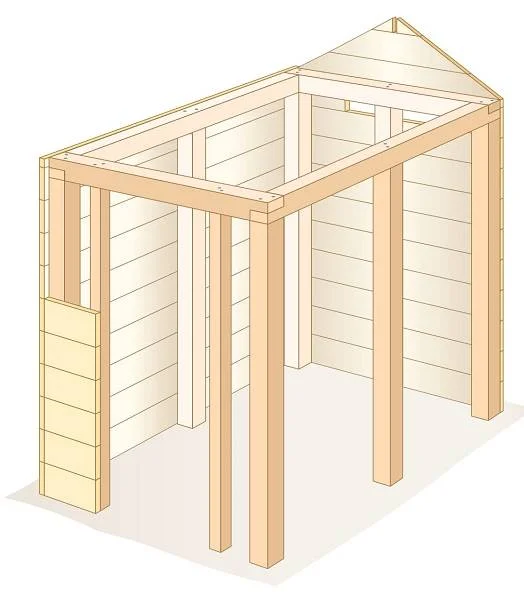
Step 2: Secure the beams
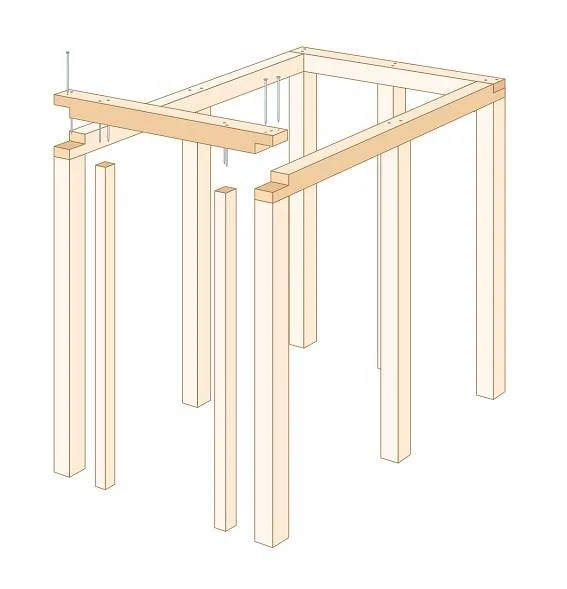
With main posts in place, work on the beams. The plans (see page TK) show how you’ll need to cut lap joints where the beams meet in the corners. Make them with multiple cuts from a circular saw every 1/4 inch (6 mm), knocking out the waste with a mallet and chisel.
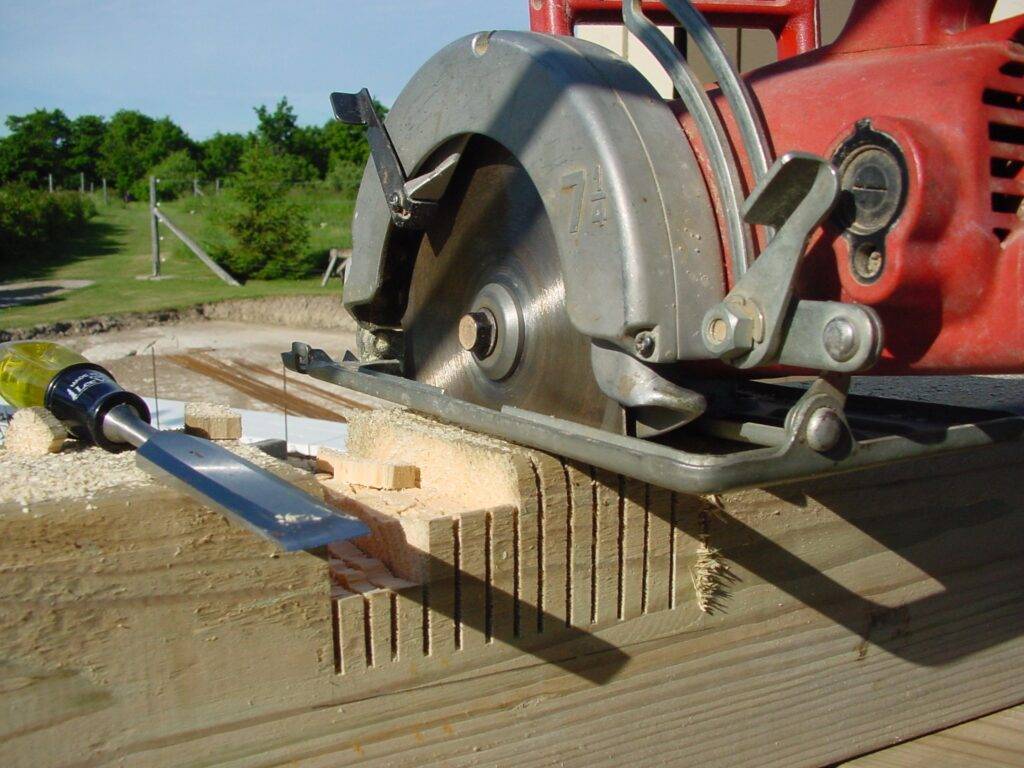
Most circular saws can’t cut deep enough to get down to the middle of a 6×6 to create notches that are deep enough for full overlap, so you’ll need to deepen the cuts using a chainsaw or handsaw before chiselling. No big deal. Just follow the same circular saw cuts to make them deeper.
Remember how you left the posts braced but without soil packed around them? That’s so you can move and adjust the posts a little as needed to get them all lined up at the top with the beams and all plumb.
With the beams in place on top of the posts, pre-drill 1/4 inch diameter holes for 12-inch-long hot-dipped galvanized spikes driven down through the beams and into the posts to hold everything together. Every hardware store carries “installer bits” long enough for this job. The pre-drilled holes don’t need to be a full 12 inches deep, just long enough to go through the beams and 3 or 4 inches into the posts. You’ll find a 6- or 8-pound sledge hammer works best for hammering in spikes like these. Wear eye protection.

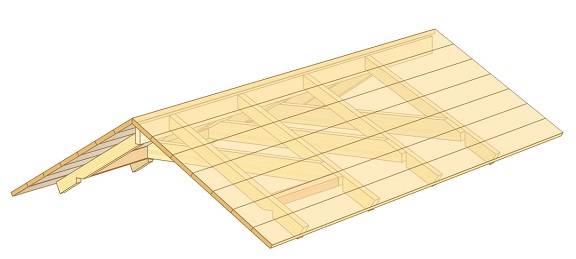
Step 3: Frame the roof
The plans show how 2×4 rafters and a 2×6 ridge board form the roof frame, along with angled blocking between the rafters above the walls to keep critters out.
- Measure the width of the building at both ends to make sure both long walls are parallel. Adjust if they’re not. When they check out, fill the space around all posts with soil tightly packed into the space. I use the handle end of a sledge hammer for this work. Remove all braces when you’re done.
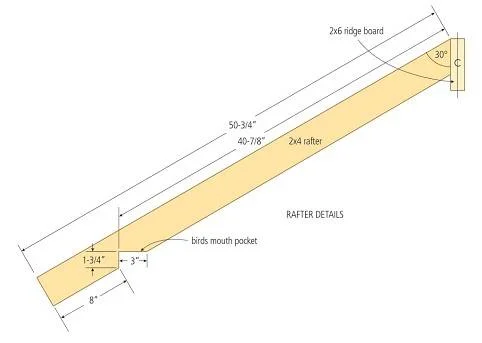
- Cut two rafters according to the plans and test them at the ends and the middle of your smokehouse. If they fit tightly to the wall and meet properly at the top with some scrap 1 1/2-inch-thick wood between them to simulate the ridge board, go ahead and cut 10 rafters in all. If your smokehouse isn’t exactly 75 inches wide at the top of the walls, you’ll need to adjust the length of the rafters to match.
- Fasten one pair of rafters flush with one end of the building frame, then another pair flush with the other end—with the ridge board in between. Deck screws and an impact driver are easier to use than nails for securing the rafters to the ridge board because screws require no pounding with a hammer. It’s also easy to take screws out and reposition parts if you don’t get them right. The plans show how the bottom ends of the rafters are best secured with an 8-inch spike driven into a pre-drilled hole in the edge of the rafter.
- Add the remaining three pairs of rafters between the pairs at the front and back of the smokehouse.
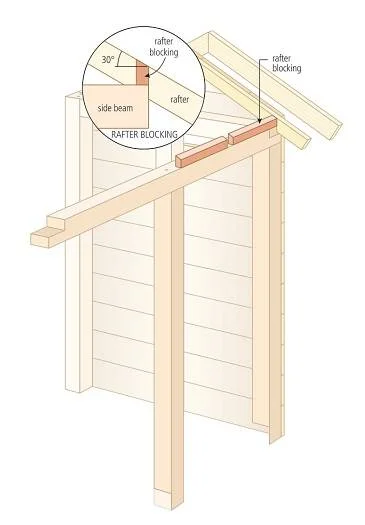
- Install blocking between the rafters, as shown in the plans. This blocking is essential for keeping critters out of the smokehouse between uses, and it’s easy to install now, before the roof boards go on.

The plans show another pair of rafters—made of 2x6s, not 2x4s—that cap the edges of the roof overhang at the front and back. These are called gable rafters, and you can cut them now for installation later, after the roof boards go on. These gable rafters are the same length as the regular ones (as measured along their top edges), but they don’t have a bird’s-mouth pocket, since they don’t sit on the walls.
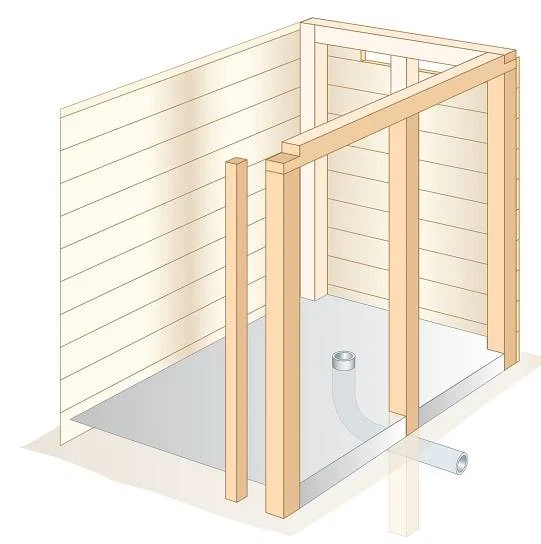
Step 4: Install the smoke pipe
If you’re making a separate, masonry firebox, as shown in the plans, now’s the time to bury a 6-inch concrete pipe and elbow into the ground leading into the floor of your smokehouse. Pipe like this is still available and works really well in this project. Dig a trench and lay the pipe in place (exact location isn’t critical), extending up 3 or 4 inches higher than the surface of your completed floor.
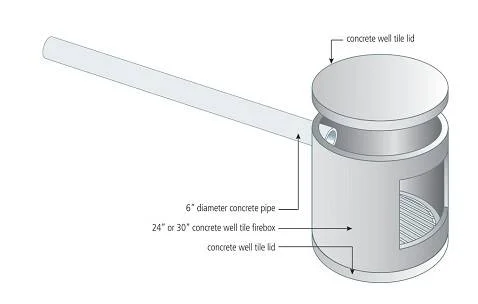
Our design features a masonry firebox made with a concrete well tile, with a concrete pipe that connects to the smoker underground. You can certainly pour your own firebox from concrete or build it from brick, block or stone, but an easier option uses 24- or 30-inch round concrete well tile, as shown in the plans. You’ll need to build on a stable foundation, but that’s no big deal.
Step 5: Sheath the walls
Wide post spacing means 1 1/2-inch-thick construction-grade lumber is the stuff to use for the walls, and it’s best for a few reasons. It’s beefy enough to span the wide space between the posts on the long walls without much flex. The extra thickness adds decades of life by resisting wear longer than thinner boards. And if you decide to make your smokehouse fancier and extend its life with cedar sidewall shingles, you won’t see nails busting through on the inside.
I use 2×8 and 2×10 boards for sheathing walls and roofs on small buildings like this one, and they do a great job. They’re also the same price or even less expensive than most of the 3/4-inch-thick lumber in my area. Use three 3 1/4-inch-long hot-dipped galvanized nails wherever a board rests on a post. Run the wall boards right up to the peak of the smokehouse at both ends, too. The plans show how the back of the smokehouse includes a hinged flap. Open it more or less to let smoke leave during use.
Step 6: Sheath the roof
This part of the construction is a lot like working on the walls. The plans show how the 2×8 or 2×10 roof boards extend past the front and back walls, supporting gable rafters that cap the edges of the roof. Start work installing the roof boards at the bottom of one side of the roof, working up to the peak. As you do, position the first roof board so it overhangs the bottom end of the rafters by an inch. This helps shed rainwater away from the rafter ends once the metal drip edge is installed before putting on metal roofing or shingles. Complete the roof by installing a pair of gable rafters at each end of the roof. These are wider than regular rafters (made of 2x6s instead of 2x4s) and are fastened to the ends of the roof boards.
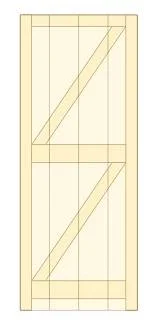
Step 7: Hang the door and complete the roof
The door is nothing more than 3/4-inch-thick rough-cut lumber held together with battens, as shown in the plans. Use three strap hinges to support the door. You could install a metal thumb latch to hold the door shut, but a couple of barrel bolts are easier to install and more secure. It’s surprising how smart raccoons can be when it comes to thumb latches and smokehouses.
You can weatherproof the roof of your smokehouse just like any other building, but metal roofing works best. There’s no chance it will impart any flavour to the food you’re smoking, and it’s easy to work with. Install metal drip edging along all edges of the roof before the roofing metal goes on, to keep the wood dry and rot-free. Roofing metal is custom-ordered to the length required. Measure your roof from peak to eaves, with an extra inch of overhang past the wood at the bottom. Be sure to order gaskets that fill the space underneath the roofing metal at the edges, to keep out bats and vermin.
At this stage, your main smokehouse structure is finished. You’ll need to add racks and hooks and such to the inside, but this is custom work. It’s best to figure out what you need based on what and how you use your smokehouse. Fasten everything with screws so it’s easy to remove and readjust later as you fine-tune your process and learn how to make good smoked food happen.
Related posts:


Steve Maxwell and his wife Mary live on a 90-acre modern homestead on Manitoulin Island, Ontario in a stone house they built with local materials beginning in 1985. Steve is Canada’s longest-running home improvement and how-to columnist and editor of Home and Property. He divides his time working on the land, building things large and small, and creating articles and how-to videos that teach sustainable, self-reliant, hands-on living skills.