Got some land to fence for livestock? When it comes to pastures and paddocks, the quality of fencing is just as important as the quality of soil. Modern options include high-tensile woven wire and polywire (or poly tape) fences. Perhaps you’ve already got a tumbledown wooden rail fence on your land that you might want to resurrect. Read on to learn about four basic fences I’ve been using on my Manitoulin Island homestead for more than 30 years, and then make an informed decision about the best option for your situation.

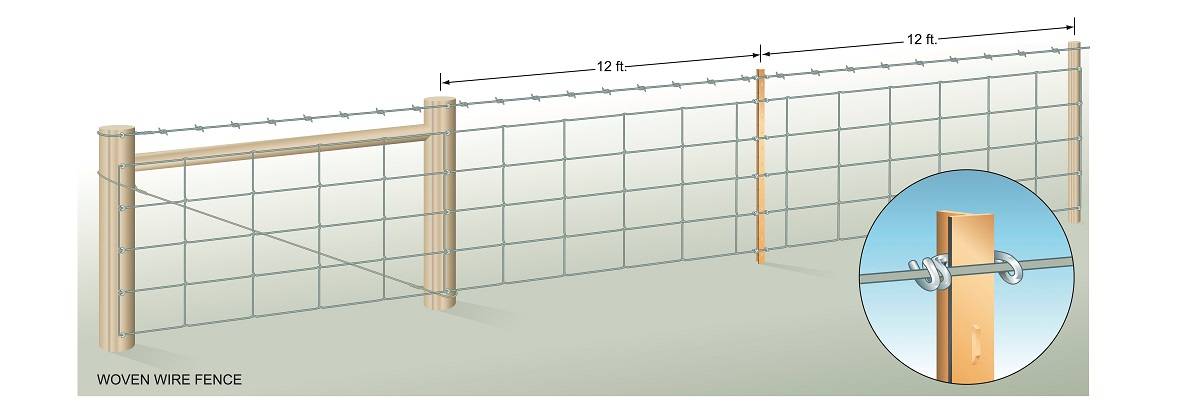
Option No. 1: Woven Wire Fence
Pros: Strong; secure; reasonably attractive
Cons: Highest annual cost; most maintenance required Sometimes called a page-wire fence, this system uses the same kind of wooden or metal posts common to other permanent fences. Page wire itself comes in a roll and is woven into a grid pattern that creates both horizontal and vertical barriers. Wooden corner posts and end posts need to be 8-feet long and at least 8-inches in diameter. Line posts should be at least 4-inches in diameter, installed along a taut string that marks the fence footprint. Posts go 36-inches into the ground in most places in Canada, spaced every 12 to 16 feet, depending on conditions. Corners need to be specially braced, too, to resist the constant pull of the tightened page wire. What’s it like putting up woven wire?

With posts installed, unroll enough 48-inch-wide woven wire to span the length of your fence run. Wrap the woven wire around one end post, then secure it with U-shaped fence staples driven with a hammer
Pull the wire tight with the help of a mechanical fence stretcher, then wrap the woven wire around the second end post and fasten it there with more staples. Walk back along the fence, securing the taut woven wire to the wooden or metal posts with more fasteners as you go. A single strand of barbed wire installed above the woven wire increases fence life by keeping animals (especially horses) from rubbing on the fence. Is your land stony or hard? This is one reason you might consider high-tensile electrified fencing (more on this later) instead of woven Paige wire. It goes up with fewer posts than woven wire—only about one post every 25 or 30 feet. Handling the heavy rolls of woven wire is also definitely a job for two people. Despite the challenges, woven wire gives plenty for your money and installation efforts. It’s the kind of permanent, reliable fence that has become the industry standard for containing cattle, sheep, goats and level-headed horses. This fence is highly visible to the animals inside, making it safer, too. Woven wire is also good insurance against damage to valuable crops by stray livestock.
Installation Cost: $3,451 per quarter mile (9-strand 12.05-gauge woven wire design).
>>>>>>>>>>>
Earth Anchors Work Great


One of the best ways to brace the end or corner of a fence is with an earth anchor. Screw the anchor into the earth and it will resist a tremendous amount of pulling force and resist it for the long haul. I use a crowbar in the eye of the earth anchor to tighten it into the soil.
<<<<<<<<<<<<

Option No. 2: High-Tensile Electric Fence
Pros: Least costly permanent fence to install; lowest annual cost of ownership; high containment power
Cons: Most technically complex fence; requires regular monitoring; fencer can be ruined by lightning strike if not protected For many rural people, high-tensile electric fences are an ideal choice. High-tensile electric is the least expensive permanent-type fence to install, with the lowest annual cost of ownership over the expected 25-year working life. High-tensile electric is also the handiest system if you don’t have a tractor-driven posthole auger at your disposal. That’s because wooden posts are only required at the ends. Widely spaced steel T-posts can be used for the rest of the run, and these are easy to install by hand with the correct pounding tool. You can even make a T-post pounder easily in your own workshop.

Get a 48-inch-long chunk of 2-inch steel pipe, then weld a chunk of 4-inch-long chunk of 2-inch-diameter solid steel in one end. I made a pounder like this in 1986 and it’s still working well today. No handles are needed, just grip the pounder with your hands, slide it over the T-post, then raise it and bring it down hard on the post to drive it in. Don’t bother trying to sink T-posts with a sledge hammer. It’s a futile exercise in self-endangerment. Since the entire tensile fence system is electrified, it includes at least two kinds of insulators (line insulators and end insulators) to keep the live fence wires from getting neutralized to the ground, wasting shocking power. You’ll also need an electric fencer (see Choosing and Using an Electric Fencer) to energize the wires to complete the circuit.

Installation Cost: $1,782 per quarter mile (2 strands of wire; 40-inch-tall, 5-inch cedar posts; includes cost of basic fencer).
Option No. 3: Low-Tensile Electric Fence

This is a temporary fence most suitable for dividing pastures for rotational grazing, or to keep deer out of your vegetable garden. Most installations use a single run of electric polywire, poly tape or small-diameter metal wire. Here at our place, we use this system to divide pastures for rotational cattle grazing, with permanent high-tensile electric or cedar rail fencing around the perimeter of fields. There are different options for low-tensile fence posts, but the handiest by far is something called a “step-in post.” The ones I use are made by Gallagher. Simply press the forked bottom end into the soil with your foot, then route the polywire or metal wire through the curved pigtail top end. There’s no need for an insulator because the pigtail top is covered in a layer of plastic.
Installation Cost: $210 per quarter mile (single strand of polywire, plus pigtail step-in posts every 30 feet).
Option No. 4: Reviving an Old Cedar Rail Fence

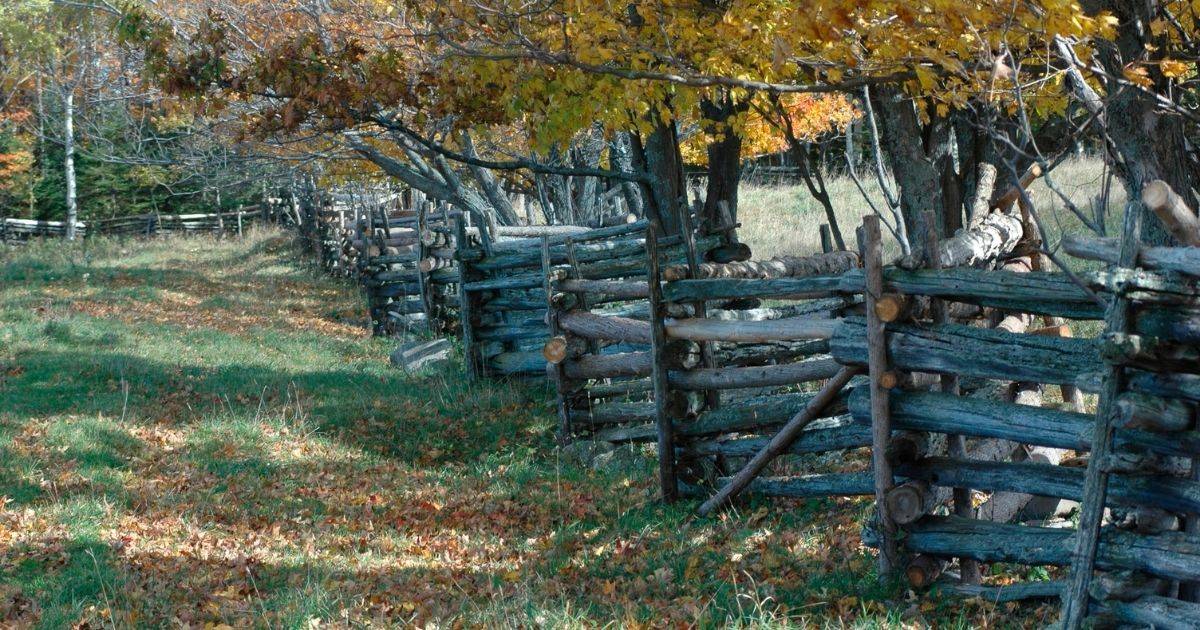
Is that old rail fence you’ve got worth mending? Before you say no, consider the fact that a good cedar rail fence is one of the most durable and beautiful ways to contain cattle, horses and sheep. We have a couple of kilometers of cedar rail fences at our place, some in continuous use for more than 100 years. In areas with ample cedar forests, repairing and maintaining cedar rail fences is still quite practical. You can even consider hauling in rails from crumbling, unwanted rail fences in the neighbourhood to use for repairing yours.
Construction styles of cedar rail fences vary depending on where you live, but the most durable designs all share one feature: They use malleable No. 9 or No. 12 fence wire to strengthen key locations. The most durable designs are called “snake rail” fences because they’re built in a zigzag pattern. A set of 12- or 13-foot rails interlock in a log cabin style and advance the fence by 8 or 9 feet. A pair of vertical stakes wired together through the rails holds the corners strong. And if you’re considering a rebuild, take the trouble to put a field stone underneath each place where the fence touches the ground. It’s like getting a free rail as far as fence height goes. You’ll keep the wood high and dry so the bottom rails last longer. You can extend the life of cedar rail fences by putting a single electric wire along each side. This stops horses or cattle from rubbing on the fence and knocking rails down.

Installation Cost: $8,580 per quarter mile (assuming a $6.50-per-foot cost if you had to purchase the cedar rails on the open market at $3 or $4 per foot, plus $2.50 per foot for labour). However, almost no one builds cedar rail fences from scratch these days.
*
Fences are a key component of any kind of success with livestock. Take the time to choose and build the best possible fences, and you’ll be one big step closer to making successful self-reliance a reality on your land.
>>>>>>>>>
Fencing With Plastic Posts

We’ve used plastid fence posts at our place, and I like them a lot. Even the legendary longevity of cedar won’t stop rot from attacking wooden fence posts and bringing them down quicker than you think. The problem is especially bad at ground level, where biological factors encouraging rot are the most vigorous. This is why various manufacturers offer recycled-plastic fence posts for farm use. But are they any good? Yes, though there are some drawbacks. Plastic fence posts are generally more expensive than wooden ones and they’re not as strong or as bend resistant. This means you can’t always expect them to stay straight if used as a brace. On the plus side, plastic posts can be cut and worked the same way as wood. Most types even take galvanized fence spikes without the need for pre-drilling.
<<<<<<<<<<<<<<
Choosing and Using an Electric Fencer

Many permanent fences are electrified, and the power behind any electric fence is different from the electricity that comes out of a wall socket or battery. Creating this unique form of power is the job of a fencer. Also called a “charger” or “energizer,” this device takes relatively low-voltage electricity from a wall socket or battery and bumps it up to 2,000 to 10,000 volts at the fence wire, with a corresponding drop in amperage. The result is a very lively bunch of electrons that are eager to try and make their way back to ground via anything that touches the fence wire. And when those electrons pass through a cow or a horse (or a homesteader!), there’s no question about what happened. The result is a shocking deterrent, but also one that poses no significant safety hazard. If you’ve ever touched the spark plug wire on a running engine, you know what an electric fence bite feels like.

The other fundamental issue with any electric fence is grounding. You can have the best fencer in the world, but it’s going to be useless without a proper electrical connection to the earth. This is a crucial and often overlooked detail that can impair the performance of any electric fence. You should use a minimum of three metal ground rods driven into the soil for each fencer in your system. Three 1/4-inch-diameter, 6-foot-long galvanized steel rods optimize fencer performance in most soil conditions. Steel T-posts also work well as ground rods.

That’s what we use most often at our place. You may need more rods in very dry ground, since the earth is less conductive. Pound the ground rods in 10 feet apart, so only 6 inches of metal remains above the earth. Connect the rods together with 12-gauge high-voltage insulated fence wire (don’t use regular house wire), with another run of wire back to the ground terminal of your fencer. You know you have an insufficient ground when your fence only offers mild shocking power. How can you tell? Other than assessing the fence with a hand-held electric fence diagnostic tool, a blade of green grass works well. Grab one end of the grass blade, then place the other end on the fence wire, with your other hand touching the ground. If you feel a definite zap-zap tingling feeling coming through a couple of inches of grass, you know you’ve got sufficient power and a decent connection to ground.
Steve Maxwell and his wife Mary live on a 90-acre modern homestead on Manitoulin Island, Ontario in a stone house they built with local materials beginning in 1985. Steve is Canada’s longest-running home improvement and how-to columnist and editor of Home and Property. He divides his time working on the land, building things large and small, and creating articles and how-to videos that teach sustainable, self-reliant, hands-on living skills.


