If you’re anything like me, your passion for plants knows no limits. I’m always brainstorming creative
ways to bring more greenery into my home, so why not make a statement by using beautiful plants as your
centrepiece instead of the usual floral arrangements filled with wasteful and toxic floral foam? It’s a
refreshing and no-waste twist and the perfect excuse to add some new green friends to your collection.
Here’s how I made my planter. Use these steps to inspire you to make your own with what you already have at home.
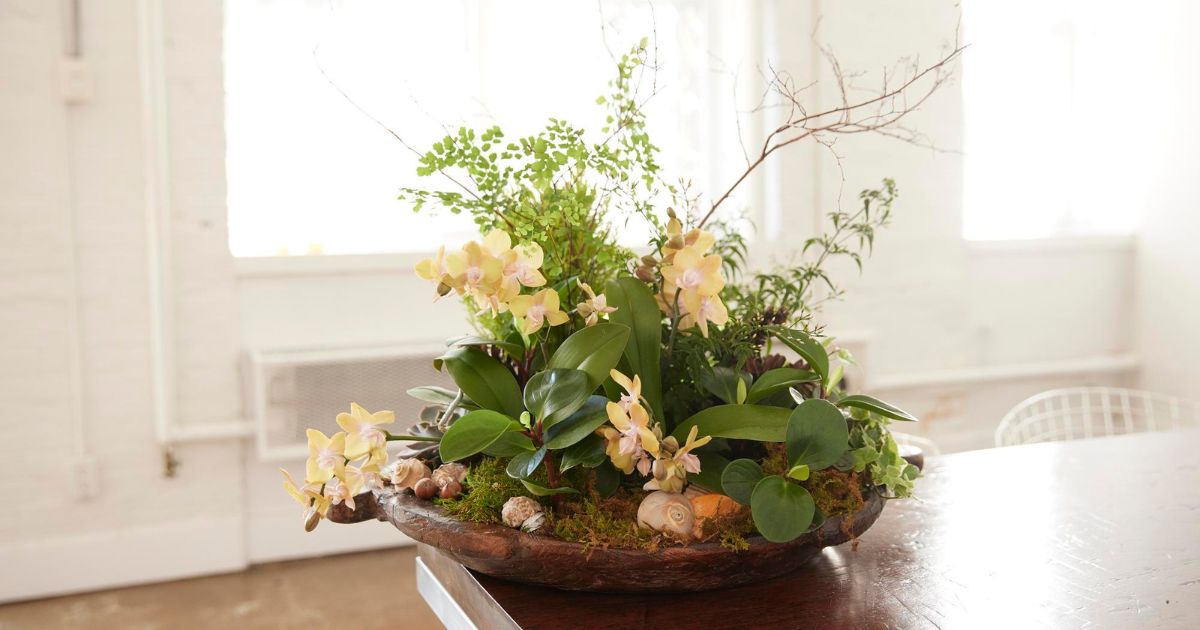
- First, I gathered an assortment of natural items that I like to collect — things like cones, seed pods, shells and nuts. I also had a few small tropical peperomia plants that needed to be repotted, so they were perfect to use, too. Tip: Other natural elements you can design with are clipped evergreen branches, dried flowers like hydrangeas and even fresh green artichokes that you can cook later.
- Next, I went shopping for new flowering plants (the orchids were perfect), a small houseplant that trails (English ivy) and a few plants with interesting foliage (I went with maidenhair fern and Echeveria).
Tip: Other favourite foliage plants for arrangements include pothos with variegated leaves, baby’s tears and all types of small ferns. - When it was time to decide on a container, I selected my favourite vintage wooden tray that I found at a yard sale years ago. When you have several different plants in an arrangement, a simple and natural
material for the vessel looks the best — you can even plant up the wooden crate that you get from your oranges this winter (line it with a reused plastic bag first so it doesn’t make a mess when you water it). - As I began planting, I added some potting soil to the planter and, much like I would design a small garden, I started with the tallest plants in the middle (the flowering jasmine and the bright green tropical cypress) and built layers of textures and different leaf shapes around the outside. When I was happy with the architecture and scale of the main plants, I added the colourful orchids and then tucked in the lacy maidenhair ferns.
- Finally, I filled the remaining space with the glossy peperomia and the new rose-pink Echeveria, then added some fresh (soaked first) sheet moss to the bottom to cover up any exposed soil. When this was done, I set a bunch of cones and nuts in different shapes and sizes on top of the moss, and I even stuck in a favourite lotus pod that I’ve reused in many different arrangements.
- For the finishing touch, I clipped some bare branches from my dormant shrubs and poked them into the soil. It added an even more forest-like feel to the naturescape I was trying to create.

Care: To care for your living arrangement, keep it watered and in a bright spot. My centrepieces usually look great for up to six weeks, and then I like to take them apart and repot them into their own pots until I’m ready to use them in another grand display. All the beauty. None of the waste!
Jennifer Reynolds, our previous Editor-in-Chief, is a long-time authority in gardening, do-it-yourself projects, urban sustainability, parenting, placemaking and community matters. Her features and columns have been published in Canadian Living, Canadian Family, Gardening Life, House & Home, Globe & Mail, National Post, Toronto Star & more. Plus, her designs and expertise have been featured on dozens of HGTV, W Network and CTV shows.


